lifestyle, entertainment, reviews

Showing posts with label adobe photoshop. Show all posts

October 5, 2012

TEXT SHAPE in Photoshiop

made a special card design for my colleague who will attend her school's 25th anniversary. a simple star shape formed by her message in text was easily done in Adobe Photoshop. see the design below.
feels happy to be able to do this again.

Want to receive more stuff from me? Enter your email address and click the button:

Share:

September 29, 2008

Photoshop Tutorial: Grungy Beer

another Photoshopping technique i've just learned. i used this technique to create a background for my Blogspot header.
  1. create a new file. i am using a flat black background with a 600 x 600 px resolution for the image. and i'm using a cropped image from my Oktoberfest pics.

  2. load your grunge brushes. if you only have the default brushes on your Photoshop, there's a lot of vector brushes found at deviantart.com. keyword is Grunge. in a new layer, play with the different brushes with black or white overlapping each print from the brushes.

  3. place your image on a new layer.


  4. with your image, now in place, duplicate it as many as you can and flatten them out. be sure to hide your original image after duplicating it.


  5. filter that layer using Filter >> Motion Blur >> (any setting). repeat the filter if you like.


  6. change the layer setting of the filtered layer from Normal to Overlay to blend it with the grunge background. unhide your image.


Share:

September 25, 2008

vectoring mode


Share:

September 23, 2008

Birth of the New Label

this the nth time i'm modifying my blog accounts and my creative juices are still flowing. from the backgrounds, headers etc. using CSS and HTML but still unsatisfied. the vector possibilities are endless so with my digital artistry. but sometimes my head cracks and dead air comes in. the laziness of this specie and the urge to copy ideas overpower me.

i have been thinking of something fresh, something to call my own. my pseudo has been given to me when i was in high school so it wasn't much mine. yeah, i have imbibed it and called it my own, but i want to lock it on everyone and remember it as me. sealing it -- and this gave me the idea.

seals and labels, what if i make something and seal my name on it? a little selfish but i think the idea is there. bringing up the old style of sealed letters and labeling, i have come up with the wax seal. very archaic but the ownership and rights are mine.
Share:

June 4, 2008

Greenpinoy will get greener!

proud of joining Greenpinoy's friends list, i would like to join his header design contest. that's it! I've been thinking what design will I do for this makulit profile.

and this has been my entries. (sineryoso ko, sayang ang P 1500 e. lol)
Share:

May 29, 2008

blogspot new look

in Photoshop mode to change my header on Blogspot. love to play on text and backgrounds. now I really love my new header! before it was "Ohmski is the Law" and now I confess that I'm an Austin Powers fan (lol) and a little bit of being eco-friendly too. ;)


btw, i have the same blogs in multiply.
Share:

May 13, 2008

Photoshop Tutorial: Simple Star

We have a lot of brushes available now for Photoshop for our vector needs. Some of them can be downloaded at deviantART and some can be made by you. In this tutorial I will teach you how to make a simple star by using the default circular brushes in Photoshop.

1. open a new document with a black background.
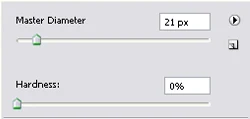
2. select the brush tool and apply a dot on the canvass using this settings:

3. the size of your brush can be increased or decreased by pressing "["(for decreasing) or "]"(for increasing). be sure the next brush setting has a smaller diameter and also the same hardness as the dot. create an X mark on your dot.

4. with the same settings (or bigger diameter), select the Eraser tool by pressing E on your keyboard. erase the ends of the X mark.

5. you now have your simple star. duplicate it on a new layer, resize it, so you can have a cluster of different stars. ;)

Share:

May 6, 2008

Photoshop Tutorial: Image on Text

Hi. It's time for a new tutorial! Here's something that I would like to share with you and I have been using this art as cover for my albums from Boracay, Villa Escudero, etc.

1. Look for a good image and open it in Photoshop. I'll be using a beach background here. Once you've opened it, go to Edit and Define Pattern As... a box will appear but just click OK.

2. make a new document as to any size you want and any background you want. type your desired text.

3. double click on the layer of the text and check Pattern. look for the image on the pattern palette and adjust the scale of the image to your text. hit OK when you're finished.

4. now you've got your image on text.


Share:

January 25, 2008

Photoshop Tutorial: Mirror Text

I used this process in making my new theme. I hope this can also help you in modifying yor sites.

Here are the steps:
  1. Type any text (any word, any color, any font) on a plain black background.


  2. Rasterize the text and duplicate it.
  3. Ctrl+T the duplicate layer, transform it vertically and move it until their bases touch. Allow about 2px distance between the texts.


  4. Use the Rectangular or Elliptical Marquee Tool and adjust the Feather setting to 25px. Then keep pressing Delete to fade out your duplicate text. Also adjust the opacity of the duplicate layer if you want the duplicate to appear more faded.


  5. Now you have your mirror text. You can also do this to an image.


Share:

Search This Blog

Intellifluence google page rank

Archives

Blog Archive